Setup local development with Liferay Portal 6.1 Community Edition
Here you can find a guide for how to setup a local development environment with the Liferay Portal
**Before you start with this guide please make sure you applied all steps from the general Eclipse IDE setup
Download and setup Liferay Portal
For getting a local installation the easiest way is to download a bundled package from the Liferay download pages.
Please grab the latest Liferay 6.1 Community Edition bundled with Tomcat.
Extract the package to a destination on your local drive.
to remove all unnecessary stuff in the Liferay bundle go to
{installationPath}/tomcat-7.0.27/webbappsand delete all subfolders except the ROOT folder (there the core Liferay binaries are located).
the package works out-of-the-box. You can start your local Liferay Portal installation just by executing:
# for linux and mac os developers
{installationPath}/tomcat-7.0.27/bin/startup.sh

# for windows developers
{installationPath}/tomcat-7.0.27/bin/startup.bat
then go to
http://localhost:8080
in your browser.
run the Liferay web configuration there and setup you admin user (during configuration).
After that your local Liferay installation is ready to go! Lets setup the connection with Eclipse IDE for convenient development
Install the Liferay IDE Eclipse Plugin
The Liferay IDE Eclipse Plugin provides a convenient way to instantly deploy and test portlet implementations.
In Eclipse go to Help - Eclipse Marketplace
There you can find the Liferay IDE Plugin

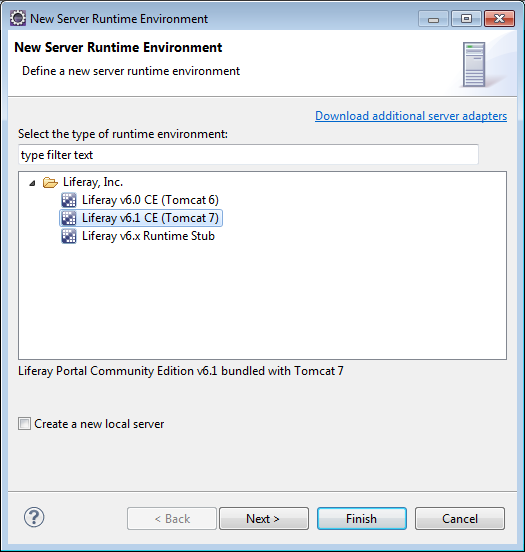
After reboot go to Window - Preferences -> Liferay -> create a new Liferay runtime environment
There you can select your previously installed Liferay installation
by selecting the correct Liferay Tomcat directory:
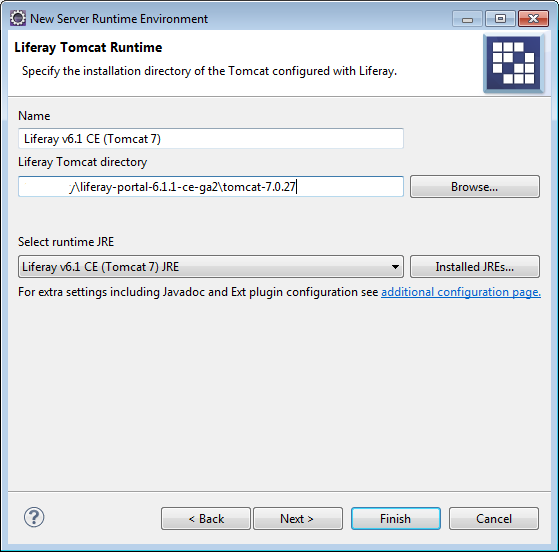
Press finish.
Now we can create a new Server in Eclipse IDE that uses the local Liferay Tomcat instance.
Go to File - New and select Server to create a new Server with type `Liferay v6.1 CE Server (Tomcat 7).
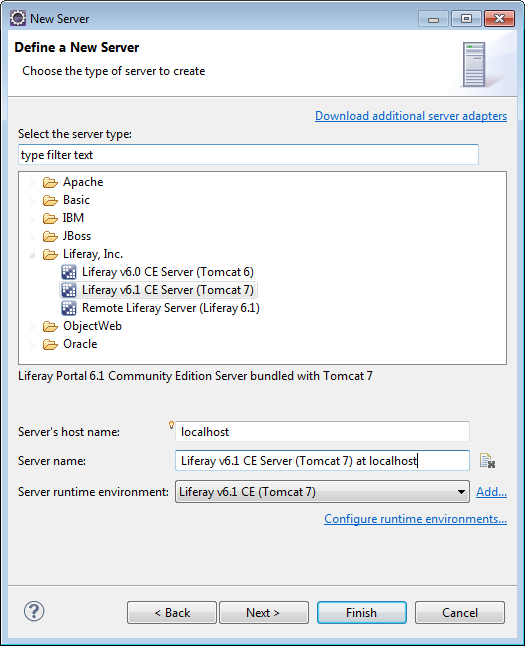
skip webapp selection for now and press finish.
-> now you are able to launch the Liferay portal within your Eclipse IDE by left-clicking on the new Server in the Server tab and pressing Start.
For the Gentics Portlet Suite we need to configure a custom JVM parameter in the Server Runtime settings
By double-clicking on the new Server you can open the Server configuration. There click on the Link Open launch configuration
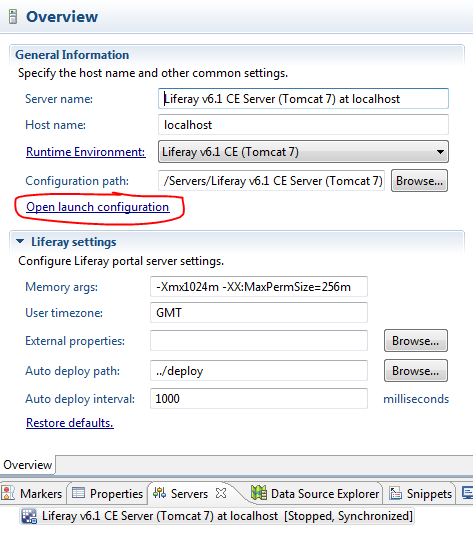
-> On the tab Arguments we have to add a parameter. Just append it to the end of the existing parameters.
-Dcom.gentics.portalnode.confpath={pathToYourWorkspace}\portletsuite\portletsuite-config\target\config-> if you have whitespaces in your path to the config you need to surround the path with " characters:
-Dcom.gentics.portalnode.confpath="{pathToYourWorkspace with whitespaces}\portletsuite\portletsuite-config\target\config"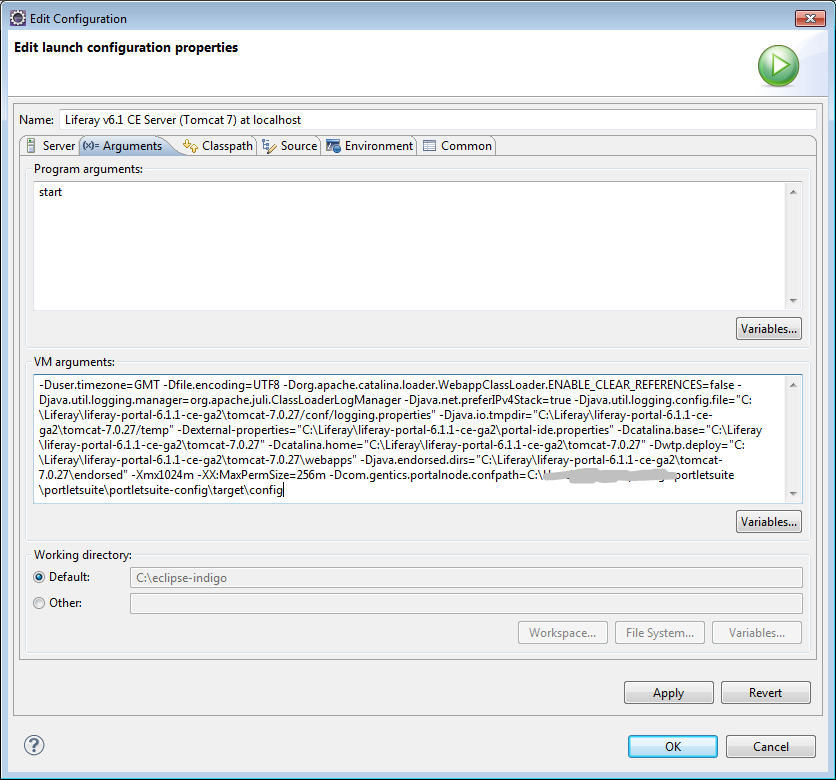
->Now the Liferay Tomcat has the right configuration.
Next we just include the maven module portletsuite-webapp to this new server
To be sure that Maven has built everything correctly just build everything again by right-click on the project portletsuite and selecting run as -> Maven build.... In the Edit configuration specify the goal:
clean package
-> The same you can perform in the command line by executing:
mvn clean package
After building the target folders of the modules should contain the output files.
-> to be sure that Eclipse recognizes all generated files just select all project modules in the Project explorer tab and refresh the view by pressing F5.
After that we can just drag-and-drop the project module portletsuite-webapp to the Liferay Tomcat server.

Now start the Liferay Tomcat server again and check if the Portlet Suite Webapp is working correctly
If everything worked fine you should be able to add the Gentics Portlets to some Portal Page:

-> if something went wrong with the setup and you get exceptions on server startup following things you may try:
- Stop the Liferay server and remove the webapp from it
- Repeat the clean package Maven goal and refresh the project modules by selecting them ans pressing F5
- Clean the projects by selecting in the top menu bar: Project - Clean - Clean all projects
- Redeploy the webapp to the server, right-click to the server and select Clean
-> now you got a complete setup for local development for the Gentics Portlet Suite.
Please check the coding guidelines when you start to develop.