Gentics Portlet Suite Setup
Here you can find some basic installation and setup instructions.
Before you start to setup and install the Portlet Suite on your system, please check the system requirements.
It is simple to install the Gentics Portlet Suite Webapp to your existing portal. The easiest way is to follow these steps:
- Download or build the package and deploy the portletsuite-webapp.war to your Java portal.
- Build and provide the portletsuite-config on your portal server. Alternatively you can download a basic configuration. Dont forget to replace your correct settings in the right place.
- Provide parameter to the JVM of the portal in order to find the configuration.
Attention: special instructions apply for setup on jBoss with Liferay
Note: for the CMS-Preview functionality please use this war, it includes additional Content Connector CMS Request Processor classes.
Build the configuration
In the module portletsuite-config you can find the basic configuration files for the portlets that have to be provided on the server where the portlets are deployed. The biggest part of that configuration consists of the Content Connector configuration.
The src/main/resources folder of the module consists of these sub directories:
/index   # index folder. Here the Lucene Indexer Search files will be located. No further configuration needed
/rest     # rest folder. Here the configuration of all portlet instances and some more configs are located
/templates  # template folder. Here the template files for the portlets are located
For more detailed information about the configuration structure please check the documentation of the specific portlets.
These configuration files can be setted up and filtered with the basic parameters for your environment, e.g. Gentics Content.Node URL, Content Repository JDBC connection details etc.
Therefore the best way is to configure a Maven profile and assemble the files to a package with Maven:
Setup the Maven profile
In order to replace all important Maven placeholders a profile has to be setted up in the Maven settings.xml.
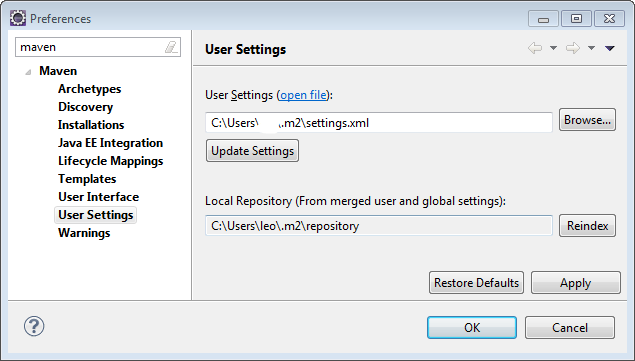
In Eclipse with installed Maven WTP plugin you can setup a settings.xml file like this:
- in the top menu go to Window - Preferences -> Maven - User Settings
- under User Settings you can configure and change your settings.xml file
Generally there you can configure all Maven specific properties. In that file you should specify a new profile with the settings of your production server:
<profile>
    <id>portletsuite-prod</id>
    <properties>
       <com.gentics.portalnode.confpath>{pathToTheConfigFolderOnTheServer}/config</com.gentics.portalnode.confpath> <!--  -->
       <com.gentics.portletsuite.datasource.type>jdbc</com.gentics.portletsuite.datasource.type>
       <com.gentics.portletsuite.datasource.driverClass>com.mysql.jdbc.Driver</com.gentics.portletsuite.datasource.driverClass>
       <com.gentics.portletsuite.datasource.url>jdbc:mysql://{yourProdServer}:22006/contentrepository?user=devuser</com.gentics.portletsuite.datasource.url>
       <gcnbackendurl>http://{yourProdServer}/</gcnbackendurl>
       <aloha.folder>latest/</aloha.folder>
    </properties>
</profile>
- com.gentics.portalnode.confpath specifies the folder where you deploy that configuration on the server
- com.gentics.portletsuite.datasource.type specifies the datasource type
- com.gentics.portletsuite.datasource.driverClass specifies the driver class
- com.gentics.portletsuite.datasource.url specifies the url to the CMS Content Repository to connect to
- gcnbackendurl specifies the url of your CMS server to connect to for frontend editing
- aloha.folder specifies the correct subfolder of the Aloha Editor package in the Gentics Content.Node installation. Default latest/
This subfolder changes on every CMS Release, so you have to change that parameter when you update your CMS installation!
-> For more information about Maven profiling please check out the maven documentation
Setup the Gentics Maven Repository
In order to be able to load all necessary maven dependencies you also have to specify your credentials in the settings.xml to be authenticated on the Gentics Maven Repository:
<servers>
   <server>
     <id>maven.gentics.com</id>
     <username>gpn</username>
     <password>YOUR_LICENSE_KEY</password>
   </server>
</servers>
- password here goes your license key
-> Dont forget to insert your correct data in this profile example.
For more details please see this link
Provide JVM parameter
The same parameter as in the configuration above we need to provide as argument to the portal executing JVM:
-Dcom.gentics.portalnode.confpath={pathToTheConfigFolderOnTheServer}/config/
For example on a Liferay bundled with Tomcat installation you can add this parameter in this file:
# for unix systems
{pathToLiferayInstallation}/tomcat-7.0.27/bin/setenv.sh

# for windows systems
{pathToLiferayInstallation}/tomcat-7.0.27/bin/setenv.bat
-> just append this parameter to the existing ones in that file.
Note: the configuration can be placed anywhere on the portal server, but the JVM of course needs read rights
After that the Gentics Portlet Suite is ready to go on your portal!